Summary
Roways iPhone Unlocker is a user-friendly solution known for efficiently unlocking disabled iPhone screens with advanced technology. Free methods like Recovery Mode or the Find My app offer alternatives, each with its own steps and considerations. Users can choose based on their preferences and technical skills.
Way: Unlocking a Disabled iPhone Using Roway iPhone Unlocker
One of the standout features of Roways iPhone Unlocker is its versatility in tackling various screen locks. Whether it’s a forgotten passcode, a complex alphanumeric code, or any other security measure, this tool proves its effectiveness across a spectrum of scenarios. Users can rely on Roways iPhone Unlocker to swiftly and securely regain access to their disabled iPhones without the need for intricate technical know-how.
iPhone Unlocker
Unlock your screen lock, Apple ID, and Screen Time passcode immediately. Support all models iPhone, iPad, and iPod touch.

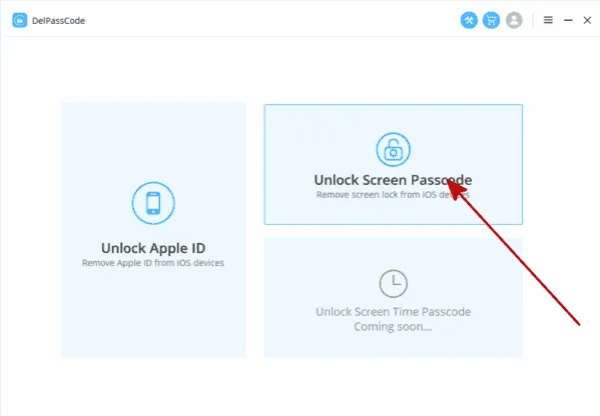
Step 1. Launch the application and establish a connection between your smartphone and the computer. Once connected, a menu with four options will appear. Opt for the Screen Passcode Unlock and proceed by clicking the Start button. Allow the program, named Passvers, to take charge of the subsequent steps.
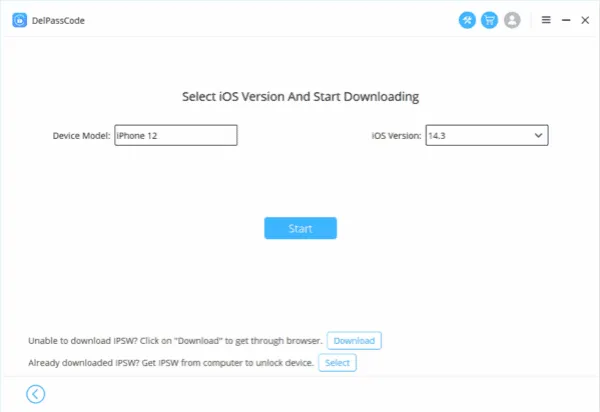
Step 2. The software initiates the download of an appropriate firmware package tailored to your device’s specifications.
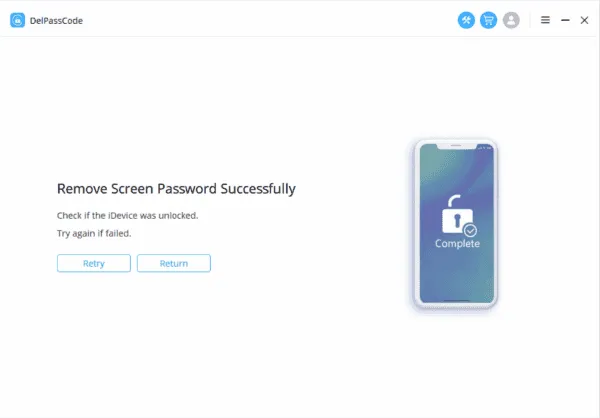
Step 3. Adhere to the prompts displayed on the screen to complete the unlocking procedure seamlessly. Following successful completion, you will regain access to your iPad, enabling you to effortlessly set a new screen passcode.
Roways iPhone Unlocker emerges as a standout solution for those grappling with a disabled iPhone screen. Its advanced removal technology, user-friendly interface, and commitment to data security collectively position it as a reliable and highly-regarded choice among iPhone users seeking an efficient and trustworthy unlocking solution.
Free Way 1. Unlocking a Disabled iPhone Using Recovery Mode
Recovery Mode is a troubleshooting feature embedded in iOS devices, including iPhones. It allows users to restore their devices to factory settings, update the firmware, or reinstall the operating system. When an iPhone is disabled, Recovery Mode provides a method to erase its data and restore it to a functional state.
Step 1: Connect your iPhone to a Computer:
– Use a USB cable to connect your disabled iPhone to a computer that has iTunes installed.
– Launch iTunes if it doesn’t open automatically.
Step 2: Force Restart your iPhone:
– The method to force restart your iPhone varies depending on the model:
– For iPhone 8 and later: Press and quickly release the Volume Up button, press and quickly release the Volume Down button, and then press and hold the Side button until you see the recovery mode screen.
– For iPhone 7 and 7 Plus: Press and hold the Side and Volume Down buttons simultaneously until you see the recovery mode screen.
– For iPhone 6s and earlier: Press and hold the Home and Side (or Top) buttons simultaneously until the recovery mode screen appears.
Step 3: Enter Recovery Mode:
– Once the iPhone is in recovery mode, iTunes on your computer should detect it and display a dialog box with options to Restore or Update.
Step 4: Choose the Restore Option:
– Click on the “Restore” option. This will erase all data on your iPhone and install the latest iOS version.
Step 5: Wait for the Process to Complete:
– iTunes will download the necessary software and restore your iPhone. This process may take some time, so be patient and ensure that your computer remains connected to the internet.
Step 6: Set Up your iPhone:
– Once the restoration process is complete, your iPhone will restart. Follow the on-screen instructions to set up your device. You can choose to restore from a backup if you have one.
Unlocking a disabled iPhone using Recovery Mode is a straightforward process that involves connecting your device to iTunes, forcing a restart, and initiating a restore. While this method erases all data on the iPhone, it is an effective way to regain access to a disabled device.
Free Way 2: Unlocking a Disabled iPhone Using the Find My App
We’ve all been there – forgetting a passcode or having too many unsuccessful attempts, leading to a disabled iPhone. While this situation can be frustrating, Apple has provided a solution through its Find My app. This powerful tool not only helps you locate your device but also enables you to remotely unlock a disabled iPhone. In this guide, we’ll walk you through the step-by-step process of unlocking a disabled iPhone using the Find My app.
1. Ensure Find My is Enabled:
Before you find yourself in a tight spot, it’s crucial to have Find My iPhone (now known as Find My) enabled on your device. This feature allows you to locate your iPhone, play a sound, or even erase the data remotely. To check if Find My is enabled, go to Settings > [your name] > Find My > Find My iPhone and ensure it’s turned on.
2. Access Find My App:
To initiate the unlocking process, you’ll need another Apple device with the Find My app installed. This can be an iPhone, iPad, or even a friend’s device. Open the Find My app and sign in with your Apple ID credentials.
3. Locate Your Disabled iPhone:
In the Find My app, select the “Devices” tab to view a list of all your Apple devices. Choose the disabled iPhone from the list. If the device is online and connected to the internet, its current location will be displayed on the map.
4. Enable Lost Mode:
Once you’ve located your disabled iPhone, tap on it, and select “Lost Mode.” This feature not only allows you to remotely lock your device but also display a custom message on the lock screen, helping someone who might find your iPhone contact you.
5. Set a Passcode:
During Lost Mode, you’ll be prompted to set a new passcode for your disabled iPhone. This passcode will override the existing one, allowing you to unlock the device. Make sure to choose a passcode that is secure yet easy for you to remember.
6. Unlock Your iPhone:
With the new passcode set, you can now unlock your disabled iPhone. On the device, enter the new passcode when prompted, and your iPhone should be accessible once again.
7. Disable Lost Mode:
After successfully unlocking your iPhone, go back to the Find My app on the secondary device. Select your iPhone and tap on “Stop Lost Mode” to disable the Lost Mode and remove the custom message from the lock screen.
8. Reset Passcode (Optional):
If you wish to revert to your original passcode, you can do so by going to Settings > Face ID & Passcode (or Touch ID & Passcode) > Change Passcode on your iPhone and entering your Apple ID credentials when prompted.
The Find My app is a powerful tool that goes beyond locating your device. It can be a lifesaver when faced with a disabled iPhone, providing a secure and efficient way to regain access to your device remotely.
Free Way 3: Unlocking a Disabled iPhone with iTunes
Facing the unfortunate situation of a disabled iPhone can be a frustrating experience. Whether you’ve forgotten your passcode or entered it incorrectly multiple times, you might find yourself locked out of your device. However, there’s a solution at your fingertips – using iTunes to restore your iPhone and regain access.
Step 1: Install the Latest Version of iTunes
Before you begin, ensure that you have the latest version of iTunes installed on your computer. You can download and install it from the official Apple website or update it through the App Store on macOS Catalina and later.
Step 2: Connect Your iPhone to the Computer
Use a USB cable to connect your disabled iPhone to the computer where iTunes is installed. Make sure to use the original cable that came with your iPhone or a certified third-party cable.
Step 3: Open iTunes
Once your iPhone is connected, open iTunes on your computer. If iTunes doesn’t launch automatically, open it manually.
Step 4: Put Your iPhone in Recovery Mode
The next step involves putting your iPhone into recovery mode. The steps vary slightly depending on the iPhone model:
– For iPhone 8 and later:
1. Quickly press and release the Volume Up button.
2. Quickly press and release the Volume Down button.
3. Press and hold the Side button until you see the recovery mode screen.
– For iPhone 7 and iPhone 7 Plus:
1. Press and hold the Side (or Top) button and the Volume Down button simultaneously.
2. Keep holding both buttons until you see the recovery mode screen.
– For iPhone 6s and earlier:
1. Press and hold the Home button and the Top (or Side) button simultaneously.
2. Keep holding both buttons until you see the recovery mode screen.
Step 5: Restore Your iPhone
In iTunes, you should see a prompt indicating that there’s a problem with your iPhone and that it needs to be updated or restored. Click on the “Restore” button.
Step 6: Wait for the Process to Complete
iTunes will download the necessary software and restore your iPhone to its factory settings. This process may take some time, so be patient. Ensure that your computer stays connected to the internet throughout the process.
Step 7: Set Up Your iPhone
Once the restoration process is complete, your iPhone will restart. Follow the on-screen instructions to set up your device. You can either set it up as a new iPhone or restore it from a backup if you have one.
By following these steps, you can successfully unlock your disabled iPhone using iTunes. However, keep in mind that this process erases all data on your device, so it’s crucial to have a backup if possible.


